Upgrading your garage door opener brings far more than convenience—it enhances security, safety, and even your home’s value. Scottsdale offers beautiful neighborhoods and active lifestyles, so a reliable garage entry system is vital. If you’re a homeowner wondering how to replace or install a new garage door opener, this comprehensive guide walks you through the entire process—empowering informed decisions and ensuring a smooth installation, whether you’re a committed DIYer or seeking professional support.
Why Scottsdale Homeowners Upgrade Their Garage Door Openers
Scottsdale’s homeowners update garage door openers for several reasons:
-
Old openers can become unreliable and slow.
-
Modern safety features offer peace of mind.
-
Smart technology integration allows remote access and monitoring.
-
Improved security helps prevent unauthorized entry.
-
Quieter models keep your garage peaceful.
With mild winters and hot summers, local conditions influence how well mechanical systems perform. Investing in a newer opener means fewer headaches, more reliability, and better overall functionality.
Common Problems with Outdated Garage Door Openers
Before jumping into installation, it’s helpful to recognize signs that your current opener needs replacing:
-
Unusual noises or grinding sounds
-
Frequent breakdowns or failure to open/close
-
Remote or keypad malfunctions
-
Lack of safety sensors or auto-reverse features
-
Excessive vibration or jerky movement
Addressing these problems proactively can prevent emergencies and unexpected inconvenience. If you spot any of these issues, it’s worth considering an upgrade rather than repair—especially for units older than 10 years.
Types of Garage Door Openers: Choosing What’s Right for You
Picking the right garage door opener makes all the difference. Here’s a quick comparison of common opener types:
-
Chain Drive: Sturdy and affordable; good for detached garages due to noise.
-
Belt Drive: Smooth, quiet operation suited for garages near bedrooms/living spaces.
-
Screw Drive: Minimal moving parts, lower maintenance, performs well in warmer climates.
-
Smart/Wi-Fi Enabled: Integrates with mobile devices for remote access.
Scottsdale’s climate favors belt or screw drives for their resilience to heat and silent operation. Assess your garage layout, budget, and lifestyle when choosing.
Essential Safety Features Required Today
Modern garage door openers include safety features that are now standard by law—crucial for families, pets, and protecting your property:
-
Auto-Reverse Mechanism: Reverses door if it senses obstruction while closing.
-
Photo-Eye Sensors: Detect anything in the door’s path; adds extra safety.
-
Rolling Code Technology: Prevents code theft and hacking.
-
Manual Release Cord: Allows the door to open manually in emergencies.
Always verify that your chosen opener complies with safety standards.
Step-by-Step Garage Door Opener Installation Guide
Installing a new garage door opener requires preparation, attention to detail, and a methodical approach. Follow these steps for a successful upgrade:
Step 1: Gather Tools and Materials
Check your opener’s installation manual for itemized requirements. Typically, you’ll need:
-
Garage door opener kit (with rails, motor, sensors, remotes)
-
Stepladder
-
Power drill and bits
-
Adjustable wrench and socket set
-
Screwdrivers (Phillips and flathead)
-
Measuring tape and level
-
Mounting hardware (usually supplied)
-
Safety glasses and gloves
Stay organized—having everything at hand saves time and reduces mistakes.
Step 2: Read the Manufacturer’s Instructions
Every opener model is unique. Before starting, read the instructions thoroughly. Manufacturers provide detailed guides for each step, including wiring diagrams and safety warnings.
Step 3: Remove the Existing Opener (If Applicable)
-
Disconnect power to the opener and remove backup batteries.
-
Unfasten screws and brackets holding the unit in place.
-
Lower the old motor carefully.
-
Remove rails, chains, belts, and wall controls.
-
Inspect the mounting area for damage or wear.
Dispose of the old opener responsibly—many Scottsdale recycling centers accept electronics and small appliances.
Step 4: Assemble the New Opener
-
Follow manufacturer’s assembly instructions.
-
Attach rails, trolleys, and brackets.
-
Connect motor unit and attach mounting plate.
Ensure all components are secure before moving on.
Step 5: Mount the Main Unit to the Ceiling
-
Position the opener directly above the garage door.
-
Use a level to confirm alignment.
-
Fasten the mounting brackets to joists or rafters—never to drywall alone.
-
Double-check stability; the opener should not wobble or shift.
Step 6: Install the Rail and Attach to Door
-
Attach the rail to the motor unit and extend it toward the door.
-
Fix the header bracket above the door opening.
-
Connect the trolley and arm to the garage door.
Proper alignment ensures smooth door movement—reposition if there’s any drag or bumpiness.
Step 7: Wire and Install Safety Features
-
Mount photo-eye sensors on each side of the door, six inches above the floor.
-
Run wires neatly, avoiding sharp bends and interference sources.
-
Connect safety sensors to control unit as per schematics.
-
Test sensor function: Door should reverse if the beam is broken during closing.
Step 8: Attach Wall Control and Remote Systems
-
Install wall control panel near the entryway, out of reach of children.
-
Wire according to instructions, keeping wires secure and hidden when possible.
-
Program remotes and keypads for simple access.
Some openers include apps for smartphones—connect at this stage for remote control.
Step 9: Final Safety Checks and Testing
-
Inspect all fasteners, wires, and moving parts.
-
Reconnect power and battery backup.
-
Run through full open/close cycles, watching for smooth operation.
-
Verify that auto-reverse and safety sensors function every time.
-
Adjust force settings if needed using the opener’s control panel.
Regular testing keeps your garage safe and reliable.
Step 10: Cleanup and Maintenance Tips
-
Dispose of packaging, old components, and wire scraps.
-
Lubricate moving parts (track, chain, or belt) with recommended lubricant.
-
Set a reminder for annual safety testing and professional tune-ups.
Garage Door Opener FAQs for Scottsdale Homeowners
How long does an installation take? A typical garage door opener installation can be completed in 2–4 hours by an experienced DIYer. Professional installers may need less time due to specialized tools and expertise.
Do I need a permit for garage door opener installation? Standard opener replacement usually doesn’t require a permit in Scottsdale. If new wiring or electrical work is needed, consult the city’s building department or a licensed electrician.
What brands work best in the Southwest climate? Manufacturers like Chamberlain, LiftMaster, and Genie are popular in Scottsdale for their reliability in heat and dust. Belt and screw drive models tend to operate best here.
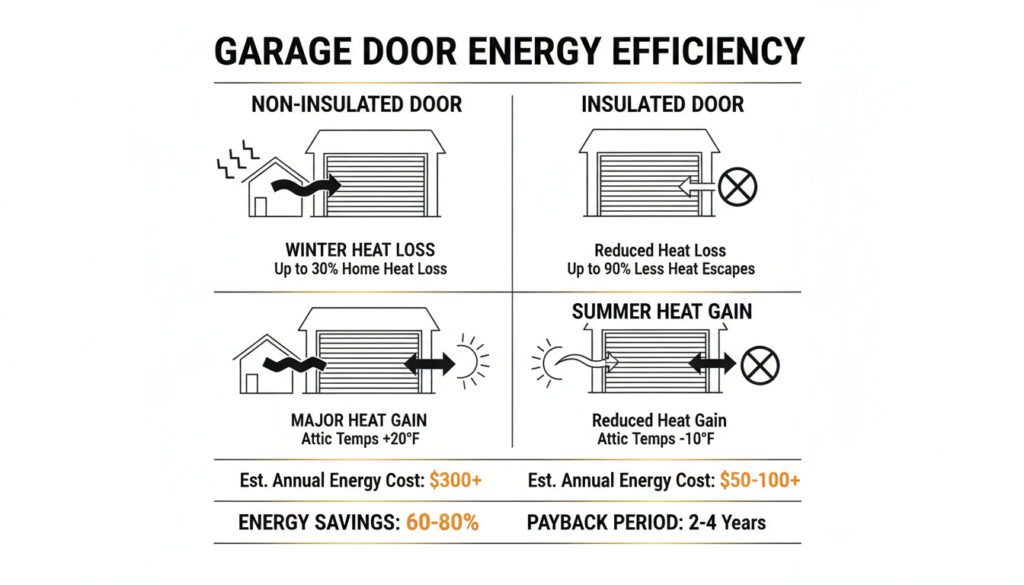
What if my garage door is unusually heavy? For insulated or oversized doors, select openers with higher horsepower. Always confirm compatibility with your door’s specifications before purchasing.
Scottsdale-Specific Installation Tips
-
Heat tolerance: Scottsdale’s summer highs can affect opener electronics; look for models rated for higher operating temperatures.
-
Dust shields: Consider enclosures or covers for motors and control panels if your garage is prone to dust.
-
Power surge protection: Install a surge protector for your opener to defend against lightning and Scottsdale’s weather events.
When to Call a Professional
While handy homeowners often succeed with DIY installation, some situations require expert help:
-
Unusual garage configurations or non-standard doors
-
Electrical or structural modifications
-
Time constraints or need for warranty protection
-
Elderly or mobility-challenged homeowners
Professional installers ensure correct setup, safety, and compliance. Local businesses understand Scottsdale’s unique conditions and building codes.
Maintenance Tips to Extend Opener Life
Increase your new opener’s lifespan by following these maintenance tips:
-
Lubricate moving parts seasonally.
-
Test auto-reverse and sensors monthly.
-
Change batteries in remotes every year.
-
Keep tracks and photo eyes clear of debris.
-
Schedule professional inspections every 2–3 years.
Proactive care saves money and trouble down the road.
Why Choose High Grade Garage Doors for Your Installation?
As a leading local expert in Scottsdale, High Grade Garage Doors takes pride in delivering skilled, detail-oriented opener installations for any need or garage type. Our team’s up-to-date training, modern equipment, and friendly approach make us the top choice for reliable, secure garage access. We stand behind every installation with a satisfaction guarantee and transparent pricing—no surprises, just results.
If you’re ready to upgrade your garage door opener or need help choosing the best model for your Scottsdale home, call High Grade Garage Doors at (602) 837-1888. Our specialists are always happy to answer your questions, schedule a convenient appointment, and ensure your opener is installed right—the first time.